Monday, November 21, 2011

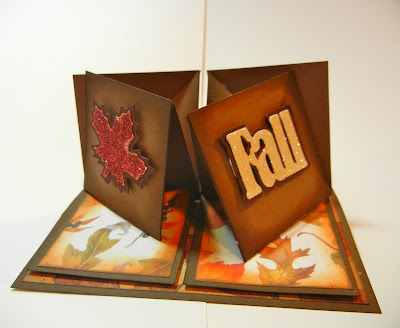
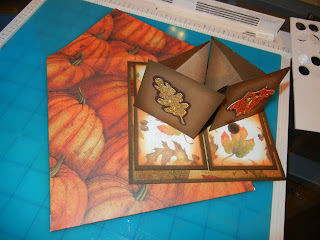
4-Way Twisting Easel Card

I made these cards and also posted a video - but never posted them on my blog (which has sadly been neglected in November (so busy)).  So with barely an hour to go, I'm going to enter them into:

My Craft Spot's 

This is a slightly different take on the traditional easel card, and I hope it meets the criteria.  The first two are Halloween cards, the third is a Fall card.  Video tutorial for the 4-Way Twisting Easel Card follows.  Thanks for taking a peek!
View 1
View 2
Overhead view of 4-Way Twisting Easel

Card goes flat for easy mailing.       


Here's my second card - very simple but still fun.  So quick and easy this way too!  Great feedback from the folks who received these cards.  They thought they were ingenious - you can make one too, just watch the tutorial!
View 1

View 2

Lays flat for mailing in square envelope.
And last but not least, a fall inspired card.
View 1. Cuts from "Straight from the Nest."

View 2

   
I designed the cards to fit in envelopes made with my MS Score Board.

Thanks for taking a peek at these blog posts.  I love "My Craft Spot" and find lots of inspiration there.  Hope you do too!

******************************************

4-Way Twisting Easel Card


Thank You Card #2

Continuing with the "Thank You" theme from FCCB's Challenge Me Monday #87, and My Sheri CRAFTS Challenge # 73, I have this to offer!


Vintage Thank You.
All the shapes were cut on my cricut with the Art Philosophy cart from CTMH!  I am thrilled to be able to buy stamps that easily coordinate with a images on my cricut for that extra "je ne sais  quoi" on a card.  Wait, I know what it is - extra cool embellishments that are EASY!

Added note:  the background paper is from a stack of vintage papers acquired at a stamp show.  The original ledger sheet has the date "2/25/1927".  So authentic.  So cool!  I color photocopied it to preserve the original, and distressed it with various DI.  I love it... and hope you do too!

Focal image stamp from Lost Coast Stamps.  Brown StazOn ink. Other stamps and cuts from Art Philosophy cart from CTMH.  Various Distress Inks.  Cardstock from DCWV.  

Fantabulous Cricut Challenge Blog Challenge Me Monday:  #87 - Thank You

Thank You Card #1

Over at the FCCB Challenge Me Monday's challenge was:

#87 – Thank You
Create a card or project with the words “Thank you” (or “Thanks”) on it

Also over at
My Sheri CRAFTS - # 73 Be Thankful

I know it screams Thanksgiving which is this week, but as I just had a birthday, my offerings are a little less holiday inspired.  I also just received my "Art Philosophy" cart and a bunch of (mostly holiday) CTMH stamps - and I'm LOVING IT!
 Stamps from CTMH, and ticket cut from "Art Philosophy."  Cream cardstock inked with Wild Honey, Shabby Shutters, Broken China, and Mustard Seed Distress Inks.  Versa Fine black ink.  MS twine.  Bazzill Basics black cardstock.


Card Interior.

MY SHERI CRAFTS CHALLENGE #73 - "Be Thankful"


Fantabulous Cricut Challenge Blog:
#87 – Thank You
Create a card or project with the words “Thank you” (or “Thanks”) on it

Sunday, November 6, 2011

Mirror, Mirror

I sure am one lucky woman.  My husband has a great eye for interiors and design, far better than mine.  We had an empty spot on the wall that needed "something" so we went out shopping.  At a local furniture store JP found this mirror which we both liked in terms of style and size (36" or so), but was it the right color?  Perhaps too gold.  But it was on sale, almost half the price of a nearly identical one on another floor.  Sold!
Was it just the lighting in the furniture store, or was the neutral metallic too gold for our interiors?

Turns out it was too gold, and our colors are black, white, silver, with blue accents.  So JP looked at me and said - "OK Crafty, do your thing."
Mirror is spray painted matte black.  Here I go with first coat of silver... in pajamas no less!

About 1/4 of the way done with the first coat of acrylic paint.
 I had left over matte black spray paint (Krylon) from Halloween.  We masked off the mirror and sprayed it all black.  I didn't want to silver leaf the thing, but did want some shine.  I mixed two kinds of acrylic paint and watered them down to make a shimmery, silver wash.  I applied the paint to the crevices and used an almost dry natural sponge to distribute the color. 

Decor Art and MS (made by Plaid) acrylic paints.
My tools - fine round brush and barely damp sponge.
 After two coats of that, I applied some silver Rub'n'Buff with my felt ink applicator.  I've used Rub'n'Buff in the past and it was sort of a waxy paste.  This one was very liquidy, almost like paint again.  But it really did the trick, and gave the piece that extra "oomph" on the raised edges. 
Look closely, that's the Rub'n'Buff in my hand. 

Idea for felt application (v. your finger (messy)) came from YT while watching a craft video... of course!

The overall effect is not shiny, silver, but more a hand-rubbed pewter with some intense silver.  Big kudos from the family, with JP proclaiming it "perfect."

Before
After

I don't usually do too many craft projects around the house - I mean especially with furniture that's brand new and just brought home from the store! My crafts are mostly relegated to my craft room and involve paper.  Even if we did get a good deal, I would have felt awful if I'd somehow messed this accent piece up.  The moral to the tale is just go for it.  You can feel a great sense of accomplishment from just trying, and happily it may end up just perfect!
Me, the happy crafter.