Sunday, December 18, 2011

Let It Snow!


My Sheri CRAFTS:  Challenge #75 - Let It Snow!

Bazzill Basics cardstock.  Art Philosophy cut.  Stamp from December 25th set from CTMH.  Offray ribbon.  Embroidery floss. Webshots American Greetings photo.
If you've just clicked here after viewing this card in a thumbnail thinking, "What stamp is so realistic looking?" please don't be disappointed!  I made many Christmas cards this year, but I have to say the ones I used featuring professional photos were my favorites, and I'm glad to share it with you!  They were quick, simple, and flat which was good for mailing.

The card also features a cut from the Art Philosophy cart and a coordinating stamp from the December 25th set from CTMH.

I purchased 5 stamp sets to coordinate with the AP cart as I think CTMH created a real winner with  stamps that coordinate with cricut cuts.  LOVE IT!  But one tip I have from using this cart is that the cut which coordinates with this charm (page 30 in the handbook, cut at  1 3/4") does not cut round!  One of the sides is sort of "wonky."  I cut the cut several times, as well as created a "shadow" by cutting it a bit larger (all cuts from my Gypsy.)  They all line up perfectly, but they are not perfectly round! Next time I'm going to go to a different cart to get a truly round ornament or charm and use it with the round stamps.  Joys of the Season or Paper Pups come to mind, but there are lots of carts that have this shape and cut it perfectly.  I'm happy with the other cuts I've used so far, especially the way they coordinate with the stamps.


I have a new home this year, and a chance to decorate it like I've never had since getting married.  I purchased accents that were multi-purpose to make my decorating dollar stretch as far as possible.  For example, I purchased some picture frames to lend a bit of holiday decor.  I then went to one of my favorite websites Webshots to download some free professional photos of the season.  Once they were on my computer I sized them and printed them out on photo paper.  Of course, now that I had awesome holiday photos, I had to use them in some paper project (layout or otherwise) and ended up using them on cards.

Thanks for taking a peek, Merry Christmas!

It's Christmas! Use It Tuesday Challenge #21

Wow, it's been forever since I've blogged, and I really have not been crafting as much as I'd like.  Here's a chance for me to exercise my creative muscle.  These cards are entered into
Use It Tuesday - Challenge #21: Holiday

 
My first card is this simple North Pole card featuring buttons.  The kraft cardstock and cut from my Art Philosophy cart are actually fairly new, but the buttons however have been sitting, sitting, sitting.... The stamp is from a grab bin last year, Inkadinkadoo Clear Mini Stamp, "Northpole."

I picked up several of these cute little totes full of buttons at a stamp show more than a year ago.  They were only like two bucks each and picked up all kinds of colors like this red/blue tote, a pink/brown tote, and so on.  Let's see, hundreds of buttons purchased over hundreds of days ago, and only appearing on a handful (if that!) of projects.  Yeah, I'd say these goodies qualify as a hoarded supply!


I was quite jazzed about my AP cart from CTMH and their coordinating Christmas stamps.  I turned out this little sparkler in an attempt to use as many cuts+stamps as possible.  The embossed kraft strip, which is popped up on foam tape over ruffled trim, is meant to represent a mantle of sorts with the stockings hanging from it.  But oh, to get those stockings to hang...read on!

 
 I thought I had the perfect coordinating sizes of jump rings... somewhere!  But these little goodies which were tucked away in a tucked away container were not the "jump" rings I'm used to.  These are much more like a car key ring or pet tag ring.  SUPER difficult to attach to my paper project.  No wonder they've sat around for years.  I can't imagine even using them for a bead project.  I would just throw them out, but when it comes to craft items I am a bit of a hoardasaurus!
Finally, the trim on the card was from an awesome TH pack.  This is item is not as old as some others, but I've had it with my other TH collections and looked at it time, and time, and time again... and thought, "I should save this for something special."  Hence, 9 months have gone by, and it was never opened.  Until now!

Thanks for taking a peek.  Merry Christmas!

Monday, November 21, 2011

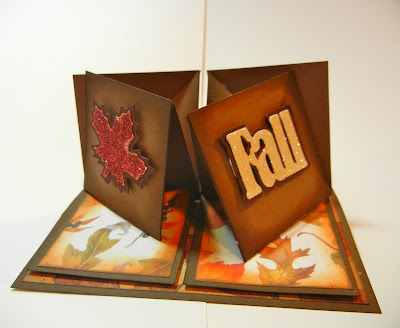
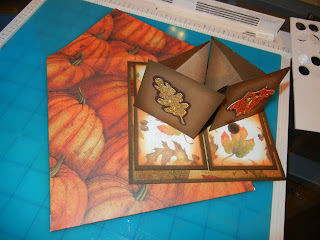
4-Way Twisting Easel Card

I made these cards and also posted a video - but never posted them on my blog (which has sadly been neglected in November (so busy)).  So with barely an hour to go, I'm going to enter them into:

My Craft Spot's 

This is a slightly different take on the traditional easel card, and I hope it meets the criteria.  The first two are Halloween cards, the third is a Fall card.  Video tutorial for the 4-Way Twisting Easel Card follows.  Thanks for taking a peek!
View 1
View 2
Overhead view of 4-Way Twisting Easel

Card goes flat for easy mailing.       


Here's my second card - very simple but still fun.  So quick and easy this way too!  Great feedback from the folks who received these cards.  They thought they were ingenious - you can make one too, just watch the tutorial!
View 1

View 2

Lays flat for mailing in square envelope.
And last but not least, a fall inspired card.
View 1. Cuts from "Straight from the Nest."

View 2

   
I designed the cards to fit in envelopes made with my MS Score Board.

Thanks for taking a peek at these blog posts.  I love "My Craft Spot" and find lots of inspiration there.  Hope you do too!

******************************************

4-Way Twisting Easel Card


Thank You Card #2

Continuing with the "Thank You" theme from FCCB's Challenge Me Monday #87, and My Sheri CRAFTS Challenge # 73, I have this to offer!


Vintage Thank You.
All the shapes were cut on my cricut with the Art Philosophy cart from CTMH!  I am thrilled to be able to buy stamps that easily coordinate with a images on my cricut for that extra "je ne sais  quoi" on a card.  Wait, I know what it is - extra cool embellishments that are EASY!

Added note:  the background paper is from a stack of vintage papers acquired at a stamp show.  The original ledger sheet has the date "2/25/1927".  So authentic.  So cool!  I color photocopied it to preserve the original, and distressed it with various DI.  I love it... and hope you do too!

Focal image stamp from Lost Coast Stamps.  Brown StazOn ink. Other stamps and cuts from Art Philosophy cart from CTMH.  Various Distress Inks.  Cardstock from DCWV.  

Fantabulous Cricut Challenge Blog Challenge Me Monday:  #87 - Thank You

Thank You Card #1

Over at the FCCB Challenge Me Monday's challenge was:

#87 – Thank You
Create a card or project with the words “Thank you” (or “Thanks”) on it

Also over at
My Sheri CRAFTS - # 73 Be Thankful

I know it screams Thanksgiving which is this week, but as I just had a birthday, my offerings are a little less holiday inspired.  I also just received my "Art Philosophy" cart and a bunch of (mostly holiday) CTMH stamps - and I'm LOVING IT!
 Stamps from CTMH, and ticket cut from "Art Philosophy."  Cream cardstock inked with Wild Honey, Shabby Shutters, Broken China, and Mustard Seed Distress Inks.  Versa Fine black ink.  MS twine.  Bazzill Basics black cardstock.


Card Interior.

MY SHERI CRAFTS CHALLENGE #73 - "Be Thankful"


Fantabulous Cricut Challenge Blog:
#87 – Thank You
Create a card or project with the words “Thank you” (or “Thanks”) on it

Sunday, November 6, 2011

Mirror, Mirror

I sure am one lucky woman.  My husband has a great eye for interiors and design, far better than mine.  We had an empty spot on the wall that needed "something" so we went out shopping.  At a local furniture store JP found this mirror which we both liked in terms of style and size (36" or so), but was it the right color?  Perhaps too gold.  But it was on sale, almost half the price of a nearly identical one on another floor.  Sold!
Was it just the lighting in the furniture store, or was the neutral metallic too gold for our interiors?

Turns out it was too gold, and our colors are black, white, silver, with blue accents.  So JP looked at me and said - "OK Crafty, do your thing."
Mirror is spray painted matte black.  Here I go with first coat of silver... in pajamas no less!

About 1/4 of the way done with the first coat of acrylic paint.
 I had left over matte black spray paint (Krylon) from Halloween.  We masked off the mirror and sprayed it all black.  I didn't want to silver leaf the thing, but did want some shine.  I mixed two kinds of acrylic paint and watered them down to make a shimmery, silver wash.  I applied the paint to the crevices and used an almost dry natural sponge to distribute the color. 

Decor Art and MS (made by Plaid) acrylic paints.
My tools - fine round brush and barely damp sponge.
 After two coats of that, I applied some silver Rub'n'Buff with my felt ink applicator.  I've used Rub'n'Buff in the past and it was sort of a waxy paste.  This one was very liquidy, almost like paint again.  But it really did the trick, and gave the piece that extra "oomph" on the raised edges. 
Look closely, that's the Rub'n'Buff in my hand. 

Idea for felt application (v. your finger (messy)) came from YT while watching a craft video... of course!

The overall effect is not shiny, silver, but more a hand-rubbed pewter with some intense silver.  Big kudos from the family, with JP proclaiming it "perfect."

Before
After

I don't usually do too many craft projects around the house - I mean especially with furniture that's brand new and just brought home from the store! My crafts are mostly relegated to my craft room and involve paper.  Even if we did get a good deal, I would have felt awful if I'd somehow messed this accent piece up.  The moral to the tale is just go for it.  You can feel a great sense of accomplishment from just trying, and happily it may end up just perfect!
Me, the happy crafter.

Wednesday, October 12, 2011

FTCCB: 81 Decor & More (Project that hangs on the wall) #3

I am just loving this challenge, because this year I really put my cricut to work!  Here's a fun banner I put together -so simple and such a fun technique with the "Make it Stone" product.  Happy Hauntings cart - THE best Halloween images ever!  So versatile!  Check out my video tutorial below for more "how to" tips!


**********Tombstone Banner Tutorial**********

 ********

 Here's a fun bonus picture of some other cricut cuts that are helping to decorate our house for Halloween this year.
Thanks for stopping by and have a Happy Halloween!

FTCCB: 81 Decor & More (Project that hangs on the wall) #2

Here's the second cricut decor project I made for Halloween.  I'm missing a bow to go over the hanger still, but aside from that I'm happy with the way it turned out.  I hope you enjoy!


Michaels ribbon.   Frames from Craft Warehouse ($4.99). Provo Craft black vinyl.  Beaded spider from Pier1.  Glitter skeleton (?) purchased at Michaels.  Bling from Recollections. Paper from Me & My Big Ideas.  Happy Hauntings cart.

FTCCB: 81 Decor & More (Project that hangs on the wall) #1

I was thrilled to see this challenge because I recently created a blog post about my Halloween decorations but didn't know how to share it with a larger number of crafters.  I hope I'm forgiven for doing a double-post, as well as stretching the criteria a bit as this isn't simply art to hang on the wall, but rather the wall is the "canvas" for the art.

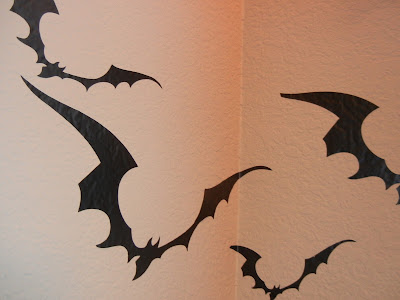
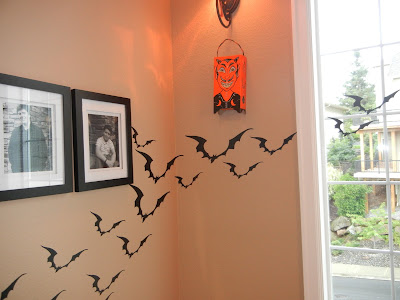
I thank Martha Stewart and some posts on Pinterest for the inspiration to create a colony of bats swarming down our staircase and out the window.  This was very easy to do, a great project for all family members, or beginning crafters considering wall vinyl art.

I used Provo Craft vinyl purchased from Craft Warehouse, although there are other less expensive online vendors. I used 3 1/2 sheets of vinyl and transfer tape to create 49 bats ranging from 3"-17". October 31 cricut cart.


Friday, October 7, 2011

Rats & Bats & Halloween Crafts

I began my Halloween decorating this week.  We still have the outside to do, and a few more finishing touches inside as well.  But here's a sneak peek at a few items you'll find in our lovely home!
Lounge entryway with black feather wreath and swag.

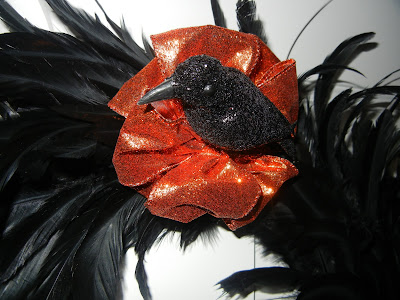
Detail of the swag and wreath.

Sweet glittery backbird nesting in the bow.  Did I someone say "nevermore?"

Pumpkin Chinese Lanterns are equipped with batteries and lights to glow at night.
Even though this home is half the size of our last home, and has relatively low ceilings compared to the old house, scale was still a toughie.  If there's anything I could change about the arrangement I would make it BIGGER!  My wreath would be twice the size (the bow 3x) and the swags would be double draped - next year, right?  Items were purchased from Michaels, Joanns, and Pier1.
Playful rats scamper along our stairs.  Bubonic plague anyone?
Black heavy-weight cardstock rats from Martha Stewart crafts.
 Lovely things happen when MS crafts go on sale - like our house being overrun with rats!  Sic' 'em Kate!

Bows completed, it was time to put my cricut to work for some other projects.
Black vinyl on a 12x24" mat.
When I really get to crafting, I literally will use anything... hey, there's even the kitchen sink!

Hot glue, ribbon, floral wire... tools of the trade.

Inspired by Martha yet again, I went to my "October 31" cricut cartridge and found one of my favorite bat images.
Cricut mat full of bats.

 Again, scale was the issue that plagued me.  I would have cut 23" bats if I could, but then the relatively inexpensive project would have soared in cost as you'd only fit 1 bat per vinyl sheet!  What I couldn't achieve in size I made up for in numbers.
Is that the rustling of the wind?

Heavens no, a colony of bats is swarming its way through our house!

I cut a total of 49 bats.

They ranged in size from 3" to 17".  Black vinyl purchased at Craft Warehouse, but there are better deals online.
Last but not least, I whipped out a project that I saw displayed at Craft Warehouse, but gave it my own Halloween twist.  I originally thought I'd add more color to the backgrounds, but ended up enjoying the simplicity of the predominately black & white color scheme.

Still need a bow to trim off the area over the hook.  And probably some beaded trim for the ribbon ends.

Cuts are from the "Happy Hauntings" cart.  Paper is Me & My Big Ideas.  Spider from a napkin ring from Peir 1, only a few dollars.

Glitter skeleton from Michaels.
As you can see, I need to add a few finishing touches, but those will be easy and fun.  It was already past the witching hour (and my bed time) and I needed to have most of the ideas completed in this one night.  These are only a few of the decorations I put up.  Stop on by the house for some cider and a visit to see more ... if you dare!

*******************
Just for fun, here's a video of a craft project I recently made as well.